Adding natural shadows to your face creates a three-dimensional effect and gives a sophisticated impression. For example, simply adding shadow to your face line will tighten your face and make it look smaller. Also, adding subtle shadows to the bridge of your nose and around your eyes will make your whole face look more glamorous. What's more, you don't need any special skills to achieve these effects. With just a few simple steps, you too can enjoy professional results. Why not add a little magic to your everyday life with makeup that creates natural shadows?
Key Takeaways
By choosing a foundation that suits your skin, you can achieve a natural finish and make your makeup last longer.
By choosing a light brown shade for shading and adding shadow to match the shape of your face, you can emphasize the three-dimensional look.
By applying the highlighter to areas where light hits and blending it carefully, you can create a natural glow.
-
Blending the boundaries between shading and highlighting is the key to making your makeup look natural.
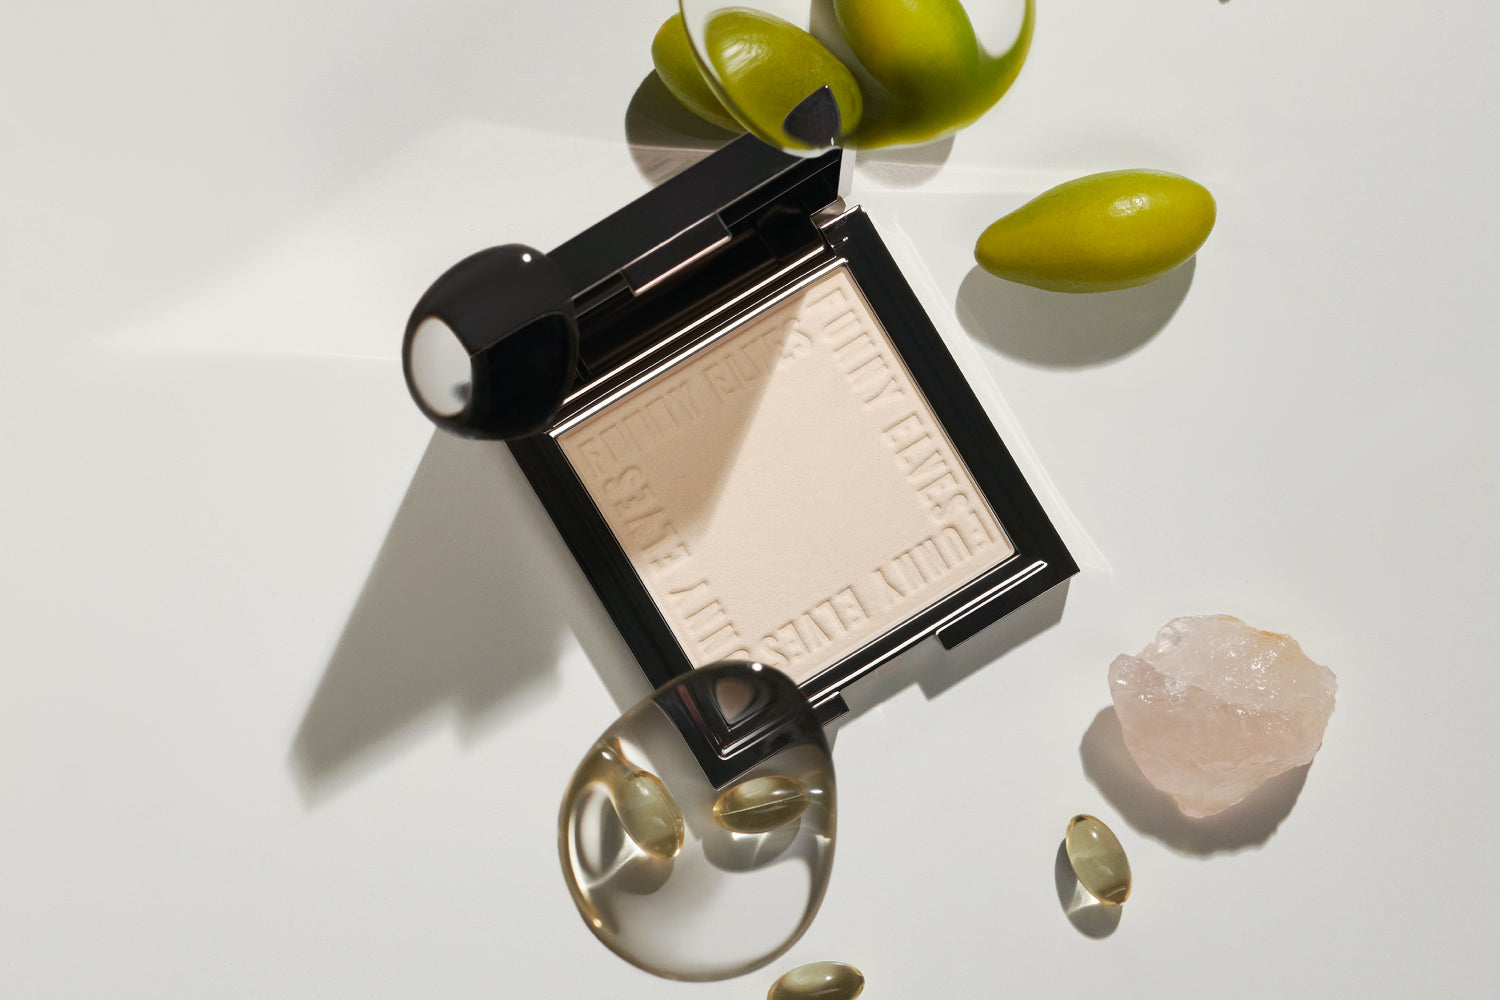
Funny Elves Soft Matte Pressed Powder helps blur pores while providing a beautiful, long-lasting finish.
Keeping your makeup tools clean and choosing the right brushes and sponges will greatly improve the results you get.
Beginners can avoid mistakes and create natural shading by layering small amounts at a time.
Basic steps to create natural shadows

Step 1: Prepare your skin with a primer
How to choose a foundation for a natural finish
Primer application is an important step that will determine the final result of your makeup. Choosing a primer that suits your skin will lay the foundation for creating natural shadows. Makeup artist Sayuri says, "Choosing a primer that matches your skin tone and texture is the key to a natural finish." For example, if you are concerned about redness in your skin, choose a green primer, and if you are concerned about dullness, choose a pink or purple primer.
In addition, by choosing a primer that goes well with Funny Elves' Soft Matte Pressed Powder, you can expect a smoother, more poreless finish. If you choose a primer that contains ingredients that are gentle on the skin, you can wear makeup comfortably for long periods of time.
Tips for applying base coat evenly
To apply the foundation evenly, dispense a small amount onto the back of your hand and spread it thinly over your entire face using your fingertips or a sponge. For an even finish, apply from the center of your face outwards. It is especially important to apply carefully to noticeable areas such as your nose, forehead, and cheeks. If you use a sponge, gently tap the product onto your skin to ensure it adheres well.
Step 2: Create shadows with shading
Basic usage of shading
Shading is an important item for adding natural shadows to the face. Makeup artist Reina advises, "When using shading, it's important to choose a tone that matches your skin tone." For beginners, we recommend a light brown powder type. Simply apply a small amount to the brush and lightly apply it to the jawline and under the cheekbones to create a firmer look.
How to add shadows according to the shape of the face
Applying shading according to the shape of your face will give you a more natural finish. For example, if you have a round face, applying shadow along the jawline will give you a sharper look. If you have a long face, adding shadow to the top of your forehead and chin will help balance it out. By applying the shade using a brush while blending, you can create a natural look without noticeable borders.
Step 3: Add dimension with highlights
Points to highlight
Highlighter is a finishing product that adds dimension to the face. It is effective when applied to areas that catch light, such as the bridge of the nose, the high points of the cheekbones, under the eyebrows, and the arch of the lip. If you add highlighter after using Funny Elves Soft Matte Pressed Powder, it will create a more natural glow.
How to blur for a natural look
To make highlights look natural, it's important to blend the edges well. Use your fingertips or a sponge to gently tap the highlighter onto your skin, and you'll achieve a finish that looks like it's blending into your skin. Applying small amounts carefully to small areas, such as around the eyes and the bridge of the nose, will help create a natural, three-dimensional look.
Step 4: Final Blend
How to blur the edges for a natural finish
Blending the edges of your makeup is essential to make your makeup look natural. After applying your shading or highlighting, blend carefully to make sure the edges are not too noticeable. Use a brush or sponge and lightly apply in circular motions to help the colors blend naturally.
Makeup artist Reina advises, "When blending, the key is to move gently and not use too much pressure." The boundaries are particularly noticeable around the face line and cheekbones, so it's a good idea to take your time blending.
You can also use the Soft Matte Pressed Powder by Funny Elves to create an even, veil-like finish on your skin. This powder is perfect for creating natural shadows while blurring pores. By lightly layering the powder at the end, you can create a uniform look and enjoy a professional finish.
Finishing techniques to make your makeup last longer
To make your makeup last all day, it's important to finish it off with a light mist to set your makeup in place while hydrating your skin. Then, use Funny Elves Soft Matte Pressed Powder to keep excess oil in check and keep your makeup looking smooth.
Makeup artist Sayuri says, "When using powder as a finishing touch, the trick is to apply it in small amounts on top of each other." By focusing on areas where oil is easily produced, such as the T-zone and around the nose, you can prevent shine while enhancing natural shadows.
In addition, if you use a sponge to lightly press the powder into your skin, your makeup will adhere better to your skin. This simple step will prevent your makeup from coming off and keep your finish looking beautiful for a long time. By incorporating these techniques, your makeup will become more sophisticated.
How to create natural shadows without mistakes
If the shading is too dark
A simple way to fix it
If the shading becomes too dark, you can fix it without rushing. First, use face powder to reduce the darkness. Take the powder on a brush and lightly apply it to the darkened areas to make the color blend naturally. Funny Elves' Soft Matte Pressed Powder is perfect for creating a natural finish while blurring pores. Another effective method is to use a sponge to lightly wipe off excess shading. The key is to touch gently without applying too much pressure.
Tips for determining the right amount
The best way to adjust the amount of shading is to apply small amounts at a time. Using too much at once can make it too dark. Take a small amount on your brush and wipe off the excess on the back of your hand before applying to your face. Beginners, especially, can start with a thin layer and gradually add more as needed to avoid mistakes. A modest amount is key to creating a natural shadow.
Highlights look unnatural
How to choose the right color
The choice of highlight color will determine the natural finish. By choosing a color that matches your skin tone, you can prevent unnaturalness. Avoid colors that are too bright, and choose champagne gold or soft pink that blends with your skin. After using Funny Elves' Soft Matte Pressed Powder, add a highlight of the appropriate color to create a more natural three-dimensional effect.
How to paint with consideration for how the light hits the surface
When applying highlighter, be aware of where the light hits. It is effective to apply it to areas where the light naturally hits, such as the bridge of the nose, the high points of the cheekbones, and under the eyebrows. Applying too much over a wide area can look unnatural, so the key is to apply a small amount lightly with your fingertips or a brush. Furthermore, careful blending will help the finish look like it blends into the skin.
When the border is noticeable
Techniques to prevent under-blending
The reason for noticeable seams is insufficient blending. After applying your shades and highlights, carefully blend them with a brush or sponge. If you're using a brush, use circular motions to blend the colors naturally. If you're using a sponge, gently tap the product onto your skin to blend the seams. Finish with Funny Elves Soft Matte Pressed Powder for an even, professional finish.
How to choose the right brush or sponge
Choosing the right tools is also important. A soft brush is good for blending shading and highlighting naturally. If you use a sponge, choose one made of a material that is gentle on the skin. The puff that comes with the Funny Elves is double-sided and easy to use, making it perfect for blending edges. Don't forget to keep your tools clean. Dirty tools not only affect the finish, but can also cause skin problems.
Recommended items for creating natural shadows
Funny Elves Soft Matte Pressed Powder
Features that blur pores and create natural shadows
If you want to create a natural-looking shadow while minimizing the appearance of pores, then the Soft Matte Pressed Powder from Funny Elves is the perfect choice. This powder is a fine powder with 2500 mesh that creates a thin veil-like finish on the skin. It softly blurs pores and smooths the skin, making it easy to achieve a professional finish. Plus, it's gentle on sensitive skin, so you can use it with peace of mind.
Many users have raved about this powder, saying, "If you're aiming for poreless skin, this powder is a must-have."
The secret to long-lasting finish
This powder is also recommended for those who are worried about their makeup coming off easily. It is designed to be resistant to sweat and sebum, and will keep your makeup on for over 16 hours. It is particularly notable for its ability to absorb sebum without drying out the skin. Simply apply a light layer to the T-zone and around the nose for a smooth, silky feel. With this one product, you can keep your makeup looking beautiful from morning to night.
Shading items
Powder type for beginners
Powder types are recommended for those new to shading. They are thin, easy to adjust, and difficult to mess up. Simply apply a small amount to the brush and lightly apply it to the face line and under the cheekbones to create a natural shadow. In particular, choosing a brown shade that blends well with the skin will give you a natural finish.
Professional cream type
For those who want to achieve a more three-dimensional look, cream-type shading is perfect. Cream-type shading has a strong adhesion and can create a solid shadow. When blended with your fingers or a sponge, it will have a finish that melts into the skin. It is a favorite item of professional makeup artists and is perfect for makeup on special occasions.
Highlighting items
Liquid type that gives a natural shine
Liquid highlighters are perfect for creating a natural glow. Simply apply a small amount to your fingertips and lightly dab on your cheekbones and nose to create a glowing look that comes from within. Liquid highlighters spread easily and blend easily into the skin, making them easy to use even for beginners.
Easy-to-use stick type
Stick-type highlighters are convenient for touching up your makeup on busy mornings or when you're out and about. Simply apply directly to the skin and lightly blend with your fingers to create a three-dimensional finish. They're easy to carry around, so it's handy to have one in your pouch. They're also a great item for natural makeup.
Blending Tools
How to choose and recommend brushes
Choosing the right brush is key to the final look of your makeup. The better the quality of your brush, the smoother your shading and highlighting will be. Choosing a brush with soft bristles will be gentle on your skin and give you a natural finish.
We recommend a face brush with rounded bristles, which are perfect for blending your shading and highlighting evenly, and pair it with our Funny Elves Soft Matte Pressed Powder for a more professional finish.
Makeup artist Reina also advises, "When choosing a brush, check how it fits in your hand and how soft the bristles are."
When using a brush, it is important to use a light touch. If you use too much pressure, your makeup will become uneven, so be careful. For a natural finish, use circular movements, especially around the jawline and cheekbones.
How to use sponges and recommendations
Sponges are a useful tool for making your makeup stick to your skin. They are especially useful for blending the edges of your makeup. Choosing a sponge made of a soft material will help you create a natural finish without putting any strain on your skin.
The Funny Elves puff is double-sided and easy to use, perfect for beginners. One side of the puff can be used to evenly apply powder, and the other side can be used to blend. With just this one product, you can easily achieve a professional finish.
When using a sponge, the trick is to gently tap the product onto the skin. Be sure to blend a small amount at a time, especially in small areas such as the bridge of the nose and around the eyes. Also, don't forget to keep the sponge clean. A dirty sponge not only affects the finish, but can also cause skin problems.
Makeup artist Sayuri also recommends, "When using a sponge, apply small amounts of makeup at a time to avoid mistakes."
By using brushes and sponges effectively, you can improve the finish of your makeup dramatically. Find the tool that suits you best and enjoy natural shadows!
Creating natural shadows gives your face a three-dimensional look and makes it easy to achieve a sophisticated impression. Anyone can easily do this using the steps and items introduced in this article. In particular, Funny Elves Soft Matte Pressed Powder is a reliable item that blurs pores while supporting a natural finish. Why not try using this powder today and enjoy professional makeup?
FAQ
How can I make the shading look natural?
Choosing the right brush is important to achieve a natural shading finish. Using a makeup brush that is larger and softer than the brush provided will give you a soft finish. If you are using a powder type, apply it lightly with the brush and then blend in a circular motion. If you are using a liquid or cream type, carefully blend it with a sponge to make the border less noticeable.
If you find it difficult to apply shading, try using a larger brush. It will greatly increase your success rate!
What's the trick to choosing the right highlight color?
The key to choosing highlight colors is to match them to your skin tone. For those with yellow undertones, we recommend warm "classic" colors. For those with blue undertones, cool "modern" colors look good. By choosing a color that blends naturally with your skin, you can create a three-dimensional effect.
Is there an easy way for a beginner to create shadows?
Powder-type shading is recommended for beginners. It is thin, easy to adjust, and difficult to make mistakes with. It is even easier to use if you choose a product that comes with a dedicated brush. First, apply a small amount to the brush and lightly apply it to the jawline and under the cheekbones. Build up the product little by little to create a natural shadow.
My makeup comes off easily, how can I make it last longer?
To make your makeup last longer, it is effective to use face powder as a finishing touch. Funny Elves' Soft Matte Pressed Powder in particular absorbs sebum while providing a non-drying finish. Simply apply a light layer to the T-zone and around the nose for a smooth, silky feel. Also, using face mist in combination helps your makeup adhere to your skin.
How can I make the border less noticeable?
Blending is key to a smooth finish. Use a brush or sponge to blend with a light touch. If you're using a brush, use circular motions to blend the color naturally. If you're using a sponge, use light tapping motions to blend the color and make it look like it's melting into your skin.
In what order should I apply shading and highlights?
Basically, it is common to apply shading first and then add highlights. By creating shadows with shading and adding light with highlights, you can create a three-dimensional effect on your face. Finally, blend the whole thing together to create a natural finish.
How do I choose makeup brushes and sponges?
A soft bristle brush will be gentle on your skin and give you a natural finish. Face brushes with rounded bristles are especially great for blending shading and highlighting evenly. When choosing a sponge, choose one made of a material that is gentle on your skin. The Funny Elves puff is double-sided and easy to use, making it a great choice for beginners.
Where should I apply the highlighter?
Highlighter is most effective when applied to areas that receive light. The bridge of the nose, the high points of the cheekbones, under the eyebrows, and the arch of the lip are some of the main areas. Lightly apply a small amount with your fingertips or a brush and blend carefully to create a natural glow.
How do I fix a shading that is too dark?
If the shading becomes too intense, use face powder to tone it down. Take Funny Elves Soft Matte Pressed Powder on a brush and lightly apply it to the darkened areas to help the color blend naturally. You can also use a sponge to lightly wipe off any excess shading.
How do I take care of my makeup tools?
Keeping your makeup tools clean is important not only for the finish but also for the health of your skin. Wash your brushes gently with a mild detergent and dry them in the shade. Wash your sponges in the same way and make sure they are completely dry before using them again. Dirty tools can cause skin problems, so be sure to clean them regularly.